
While some people might be eager to jump straight into their seawall construction project, doing so blindly can actually lead to a lot of mistakes. These mistakes could be minimal and easy to fix, while others might cost you thousands of dollars and precious time that you can’t get back. Before you even begin your seawall, there are a few things you need to consider if you want to avoid a giant mess.
Seawall Height
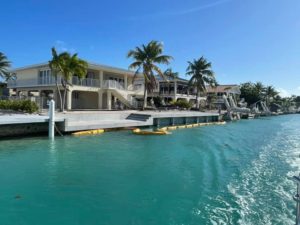
The height of your seawall is an important factor in seawall construction. How tall do you want your seawall to be? Is it already high enough? Should you be raising it? With tide levels rising by some degree each year, it’s crucial that you consider where they might be in just a few years down the road. In this case, it might be in your best interest to elevate it.
Another reason to raise your seawall height other than the rising tide is that it saves costs on demolition. When you construct a new seawall at the same level as your existing seawall, you end up needing to demo the entire seawall, but raising the height of a new one won’t be in the way since you’ll be able to go over the top of it, saving you time and money.
Deck Width
The width of your deck also plays a role in seawall construction. With a seawall, you are allowed up to an eight feet wide concrete deck, according to the local code. The greater the square footage of your seawall—and in turn, your deck—the more expensive the cost. That being said, any less than eight feet doesn’t leave a lot of deck space to utilize, so you’ll need to consider the cost-to-benefit ratio of an eight-foot-wide seawall cap based on your deck width.
Seawall Caps
Seawall caps cover the seawall panels to protect and support them with exceptionally strong concrete beams. While these are excellent for reinforcing seawalls, many local rules dictate that you must have a certain amount of permeable area in your backyard. Laying down concrete takes up a part of that area, so it’s important to check with your engineer that extending the caps to 8 feet won’t violate any rules on a local permitting level depending on the size of your lot.
Bollards
While not required, some people may choose to put bollards on top of their walls. These secondary concrete pours go over the cap and can be used in a variety of ways. They may be used to install cleats, light posts, tie off boats, and much more. Bollards can look nice when done correctly, but they can be difficult to create properly and tend to create issues later on. If you are intent on having them, it’s best to consult an engineer to see what they would advise.
Plumbing and Electricals
It’s a good idea to meet with your plumber and electrician ahead of time if there is anything that needs to be done before you pour the concrete. This might include identifying where conduits might go as well as installing them. You’ll find it is much harder to do so after the concrete has been laid. The contractor should be sure to use 5,000 PSI concrete with a corrosion inhibitor to prevent spalling in the future.
Speak With Your Contractor
If you want things to go as smoothly as possible, you’ll want to consult with your contractor before anything takes place. This means going over possible accessories to add, details on the finish of the deck, making sure everything that needs to be ordered is, and so on. The last thing you want to deal with when the seawall construction has started is finding out that something is wrong or delayed.
Plan Ahead
There’s a lot to consider before starting a seawall construction project, from the layout of future decking to leaving enough permissible room to install future lifts. It all amounts to planning ahead so that you have the space necessary for any endeavors along with correcting any violations.
Ready to begin your own seawall construction project? Let us help you out. At Rapid Permits and Engineering, we’ll cover everything from project design to permits. Call us at 365-916-1400 or email info@rapidpermitting.com to get started!


